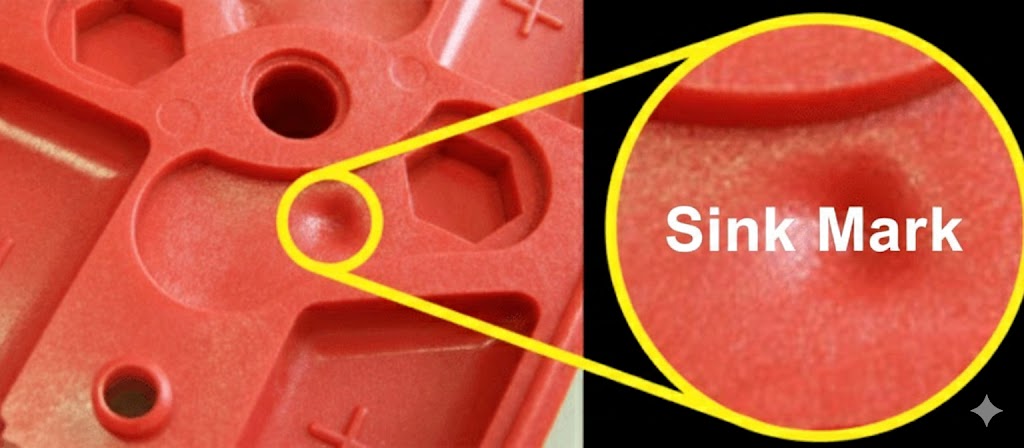
Sink marks in injection molding are one of the most common cosmetic defects in plastic parts. They typically appear as small depressions on the surface of molded components, often above ribs, bosses, or thick sections.
Most plastic design guidelines recommend maintaining uniform wall thickness, proper rib ratios, and efficient mold cooling. In theory, following these rules should prevent sink marks from appearing.
However, in real manufacturing environments, sink marks can still occur even when the mold design is technically correct.
This happens because sink marks are not caused by a single factor. Instead, they result from the interaction between material properties, mold design, cooling conditions, and processing parameters.
In this article, we explore the most common reasons why sink marks in injection molding still appear despite a well-designed mold.
What Are Sink Marks in Injection Molding?
Sink marks are surface depressions that occur when the interior of a plastic part shrinks during cooling but the outer surface has already solidified.
As the inner material contracts, it pulls the surface inward, creating a visible indentation.
Sink marks most often appear in areas such as:
- Above reinforcing ribs
- Around screw bosses
- Near thick wall sections
- At intersections of structural features
Although sink marks may not always affect structural performance, they can significantly reduce the cosmetic quality of molded products.
1. Material Shrinkage Behavior
One major cause of injection molding sink marks is material shrinkage.
Different plastics shrink at different rates during cooling. Semi-crystalline materials such as:
- polypropylene (PP)
- polyamide (PA / nylon)
- polyoxymethylene (POM)
tend to shrink more than amorphous plastics like ABS or polycarbonate.
During cooling, the internal material may continue shrinking while the outer surface layer has already hardened. This difference in shrinkage behavior creates internal stress that pulls the surface inward.
As a result, sink marks can appear even when the part design follows recommended wall thickness guidelines.
2. Localized Material Mass
Even with good design practices, certain features inevitably create thicker material areas.
Common examples include:
- reinforcing ribs
- mounting bosses
- screw posts
- structural supports
Design guidelines typically recommend rib thickness of about 50–60% of the nominal wall thickness. However, these features still create regions where plastic mass is greater.
Thicker sections cool more slowly, which allows the internal material to shrink more before fully solidifying. This uneven cooling often leads to sink marks in plastic injection molding.
3. Uneven Mold Cooling
Cooling efficiency plays a critical role in preventing sink marks.
Even a well-designed mold may experience uneven cooling due to:
- deep cores
- complex cavity shapes
- limited space for cooling channels
If certain areas cool slower than others, the material in those regions will shrink more during the cooling phase.
This uneven shrinkage can produce localized sink marks on the finished part surface.
For this reason, experienced mold designers invest significant effort in optimizing mold cooling system design, including channel placement and coolant flow efficiency.
4. Insufficient Packing Pressure
Packing pressure is applied after the cavity is filled to compensate for material shrinkage.
During the packing phase, additional molten plastic flows into the cavity to replace the volume lost during cooling.
However, packing pressure may not always reach every region of the part effectively. This can happen when:
- the gate freezes too quickly
- the flow path is too long
- the material viscosity is high
When packing pressure cannot compensate for internal shrinkage, the material pulls inward and forms sink marks in molded parts.
Optimizing gate location and gate size is often critical to improving packing effectiveness.
5. Processing Conditions
In many cases, sink marks are related to injection molding process parameters rather than mold design.
Several processing conditions strongly influence sink formation, including:
- packing pressure
- packing time
- melt temperature
- mold temperature
- injection speed
For example, if packing pressure or holding time is too low, the cavity may not receive enough additional material to compensate for shrinkage.
This is why mold trials (T0, T1, and T2) are essential for adjusting processing conditions before full-scale production begins.
6. Surface Finish and Texture
Surface appearance can also affect how visible sink marks are.
High-gloss surfaces tend to reflect light strongly, which makes even small surface depressions noticeable.
By contrast, textured surfaces or matte finishes can help disguise minor sink marks.
For cosmetic products, surface finishing choices can therefore influence the perceived severity of sink marks.
7. Simulation and Mold Flow Analysis
Engineering simulation tools can help identify potential sink mark risks before tooling begins.
Software solutions developed by companies such as Autodesk and Moldex3D allow engineers to simulate:
- plastic flow behavior
- cooling efficiency
- shrinkage patterns
These simulations are extremely useful for optimizing gate positions, wall thickness, and cooling systems.
However, simulation models cannot fully replicate every real-world variable, such as machine conditions or material batch variation. Therefore, mold trials remain essential for final optimization.

How to Reduce Sink Marks in Injection Molding
Although sink marks cannot always be eliminated completely, several strategies can significantly reduce their occurrence:
Design improvements
- maintain uniform wall thickness
- minimize thick sections
- optimize rib and boss dimensions
Mold design optimization
- improve cooling channel layout
- adjust gate position and gate size
- optimize venting
Process optimization
- increase packing pressure
- extend packing time
- adjust melt and mold temperature
A combination of good part design, effective mold engineering, and optimized processing conditions is usually required to minimize sink marks.
Conclusion
Sink marks in injection molding are rarely caused by a single issue. Even when mold design appears technically correct, factors such as material shrinkage, cooling efficiency, packing pressure, and processing conditions can still lead to surface defects.
Understanding how these variables interact is essential for achieving stable, high-quality plastic part production.
By combining proper part design, mold engineering, and process optimization, manufacturers can significantly reduce the risk of sink marks and improve overall product quality.
FAQ: Sink Marks in Injection Molding
What causes sink marks in injection molding?
Sink marks are primarily caused by internal material shrinkage during cooling. When the interior of the plastic part shrinks more than the outer surface, the surface can collapse inward, forming a depression.
Where do sink marks usually appear?
Sink marks commonly appear above ribs, bosses, screw posts, and other areas with thicker material sections.
Can sink marks be completely eliminated?
In some cases they can be minimized significantly, but completely eliminating them may be difficult, especially in parts with complex structural features.
Does mold flow analysis prevent sink marks?
Simulation tools can predict high-risk areas and help optimize mold design, but real-world process conditions still require adjustment during mold trials.
Working With an Experienced Injection Molding Partner
Preventing sink marks is not only about following design guidelines. It requires a combination of part design optimization, mold engineering, and process control.
At CINDY MOULD, our engineering team works closely with customers during the early design stage to reduce potential molding defects such as sink marks, warpage, and short shots.
Our capabilities include:
- Design for Manufacturing (DFM) analysis
- Mold flow simulation to predict shrinkage behavior
- Optimized mold cooling design
- Precision injection molding and production validation
By addressing potential issues before tooling begins, we help customers reduce costly mold modifications and achieve more stable mass production.
If you are developing a new plastic product and want to avoid common molding defects, our team is always ready to support your project.